Wednesday, March 27, 2019

How do I increase the MySQL connections for my server?

These following reasons cause MySQL to run out connections.

1). Slow Queries

2). Data Storage Techniques

3). Bad MySQL configuration


If you have encountered the error “Too many connections” while trying to connect to a MySQL
Server, that means it reached the maximum number of connections, or all available permitted are in
use by other clients and your connection attempts will get rejected.

That number of connections is defined via the max_connections system variable. To open for more
connections, you can set a higher value for max_connections.

To see the current value of max_connections, run this command:

SHOW VARIABLES LIKE "max_connections";

Sample output:


By default, it’s set to 151. But MySQL actually allows up to max_connections + 1, which is 151 + 1 for
the default setting. The extra connection can be used by the user with SUPER privilege only.

To increase the max_connections value, let’s say 500, run this command:

SET GLOBAL max_connections = 500;


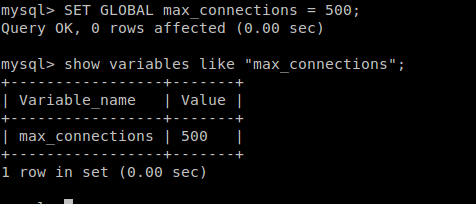
The command takes effect right after you execute it, but it only applies to the current session. If you
want it to be permanent until you re-adjust it the next time, you have to edit the configuration file
my.cnf (normally it’s stored in /etc/my.cnf).

Under the [mysqld] section add the following line:

max_connections = 500
Then restart the MySQL server to take effect.

One thing to keep in mind that there is no hard limit to setting up maximum max_connections value,
but increasing it will require more RAM to run. The number of maximum connections permitted has
to be calculated based on how much RAM you have and how much is used per connection. In many
cases, if you run out of usable disc space on your server partition or drive, MySQL might also return
this error.

The maximum number can be estimated by the formula:

max.connection=(available RAM-global buffers)/thread buffers
So increase it with caution.


Tuesday, March 26, 2019

How to check NIC will supports hardware or software time stamping in linux ?

using  ethtool -T  <interface>  will give u information about nic which supports which type of time stamping.

 ethtool -T|--show-time-stamping DEVNAME Show time stamping capabilities


Example:

 ethtool -T em1

Time stamping parameters for em1:
Capabilities:
        hardware-transmit     (SOF_TIMESTAMPING_TX_HARDWARE)
        software-transmit     (SOF_TIMESTAMPING_TX_SOFTWARE)
        hardware-receive      (SOF_TIMESTAMPING_RX_HARDWARE)
        software-receive      (SOF_TIMESTAMPING_RX_SOFTWARE)
        software-system-clock (SOF_TIMESTAMPING_SOFTWARE)
        hardware-raw-clock    (SOF_TIMESTAMPING_RAW_HARDWARE)
PTP Hardware Clock: 0
Hardware Transmit Timestamp Modes:
        off                   (HWTSTAMP_TX_OFF)
        on                    (HWTSTAMP_TX_ON)
Hardware Receive Filter Modes:
        none                  (HWTSTAMP_FILTER_NONE)
        all                   (HWTSTAMP_FILTER_ALL)
        ptpv1-l4-sync         (HWTSTAMP_FILTER_PTP_V1_L4_SYNC)
        ptpv1-l4-delay-req    (HWTSTAMP_FILTER_PTP_V1_L4_DELAY_REQ)
        ptpv2-l4-sync         (HWTSTAMP_FILTER_PTP_V2_L4_SYNC)
        ptpv2-l4-delay-req    (HWTSTAMP_FILTER_PTP_V2_L4_DELAY_REQ)
        ptpv2-l2-sync         (HWTSTAMP_FILTER_PTP_V2_L2_SYNC)
        ptpv2-l2-delay-req    (HWTSTAMP_FILTER_PTP_V2_L2_DELAY_REQ)
        ptpv2-event           (HWTSTAMP_FILTER_PTP_V2_EVENT)
        ptpv2-sync            (HWTSTAMP_FILTER_PTP_V2_SYNC)
        ptpv2-delay-req       (HWTSTAMP_FILTER_PTP_V2_DELAY_REQ)


Example2:

ethtool -T eth0
Time stamping parameters for eth0:
Capabilities:
        hardware-transmit     (SOF_TIMESTAMPING_TX_HARDWARE)
        software-transmit     (SOF_TIMESTAMPING_TX_SOFTWARE)
        hardware-receive      (SOF_TIMESTAMPING_RX_HARDWARE)
        software-receive      (SOF_TIMESTAMPING_RX_SOFTWARE)
        software-system-clock (SOF_TIMESTAMPING_SOFTWARE)
        hardware-raw-clock    (SOF_TIMESTAMPING_RAW_HARDWARE)
PTP Hardware Clock: 1
Hardware Transmit Timestamp Modes:
        off                   (HWTSTAMP_TX_OFF)
        on                    (HWTSTAMP_TX_ON)
Hardware Receive Filter Modes:
        none                  (HWTSTAMP_FILTER_NONE)
        all                   (HWTSTAMP_FILTER_ALL)

Monday, March 18, 2019

how to reload all kernel parameters in linux ?

You need to use the sysctl command which is used to modify kernel parameters at run time.
The parameters available are those listed under /proc/sys/.
Procfs is required for sysctl support in Linux. You can use sysctl command to both read and write sysctl variables.

Display Linux kernel parameters

Display all sysctl variables

The syntax is:
# sysctl variable
# sysctl -a
# sysctl -a | more

Sample output

vm.swappiness = 60
vm.user_reserve_kbytes = 131072
vm.vfs_cache_pressure = 100

To see value for kernel variable called kernel.hostname, enter:
# sysctl -n kernel.hostname

How do I set new values?

There are three methods to set new values for given kernel parameters as follows:

Method # 1: Setting value via procfs

You can use standard echo command to write data to variables (this temporary change):
# echo "value" > /proc/sys/location/variable
Echo “1” > /proc/sys/net/ipv4/conf/all/rp_filter

Method # 2: Temporary on the command line

Use sysctl command with -w option when you want to change a sysctl setting:
sysctl -w variable=value

To enable packet forwarding for IPv4, enter:
# sysctl -w net.ipv4.ip_forward=1


Method # 3: Configuration file /etc/sysctl.conf

This is recommended way. First open /etc/sysctl.conf file, enter:
# vi /etc/sysctl.conf

Now add value:
variable = value

example :

net.ipv4.ip_forward=1


Close and save the changes. Type the following command to load sysctl settings from the file /etc/sysctl.conf file:
# sysctl -p

OR
# sysctl -p /etc/sysctl.conf

The last method will load settings permanently at boot time from /etc/sysctl.conf file. Read man page of sysctl for information:
$ man sysctl


Reload settings from all system configuration files

Type the following command to reload settings from config files without rebooting the box:
# sysctl --system

For older versions (that is, if --system does not work):

# Load settings from /etc/sysctl.conf
sysctl -p

The settings are read from all of the following system configuration files:

/run/sysctl.d/*.conf
/etc/sysctl.d/*.conf
/usr/local/lib/sysctl.d/*.conf
/usr/lib/sysctl.d/*.conf
/lib/sysctl.d/*.conf
/etc/sysctl.conf


# Load settings from the specified file
sysctl -p /etc/sysctl.d/<whatever>.conf

example:

sysctl -p /etc/sysct.d/10-magic-sysrq.conf


Thursday, March 7, 2019

how to get symbolic link file size in linux ?

The name of the symbolic link remains fixed, but the file it is linked to is constantly changed by another application . The Motion application ensures that the symbolic link points to the correct file.

symbolic links: Refer to a symbolic path indicating the abstract location of another file

Using stat command will get  symbolic file size.


stat - display file or file system status


Syntax :

stat -Lc %s  < symbolic>

Where

-L, --dereference
                             follow links
-c  --format=FORMAT
                              use the specified FORMAT instead of the default; output a newline after            each use of FORMAT

%s     total size, in bytes


Example:  
                ls -lrt script*

 -rw-rw-r-- 1 ram ram 29366 Mar  6 01:37 script.txt
lrwxrwxrwx 1 ram ram    10 Mar 7 14:34 script -> script.txt


stat -Lc %s script
29366

Example2: using du command

du -b $(readlink -f script)

29366 /home/ram/script.txt

Monday, March 4, 2019

how to add or delete routes in linux ?


There are two commands which are useful either to add or delete route, those are  route and ip.
We will see how to change route using command route.

Understanding of routing

On Linux and UNIX systems, information on how packets are to be forwarded is stored in a kernel structure called a routing table. You need to manipulate this table when configuring your computer to talk to other computers across a network. The routing table can be used for both static and dynamic routing. Dynamic routing consists of the kernel making decisions as to which route, out of multiple present routes, a packet should take. Since dedicated routers and ISPs generally deal more with dynamic routing.


NAME
      route - show / manipulate the IP routing table

SYNOPSIS

      route [-CFvnee]

      route [-v] [-A family] add [-net|-host] target [netmask Nm] [gw Gw] [metric N] [mss M]
[window W] [irtt I] [reject] [mod] [dyn] [reinstate] [[dev] If]

      route [-v] [-A family] del [-net|-host] target [gw Gw] [netmask Nm] [metric N] [[dev] If]

      route [-V] [--version] [-h] [--help]


Adding route


sudo route add -net 192.168.3.0 gw 192.168.1.1 netmask 255.255.255.0 dev eth0

sudo route add -net 192.168.3.0 gw 192.168.1.1 netmask 255.255.255.0 dev eth0

View route

We can use

route -n
Or
sudo ip route show
Or
netstat -rn

Deleting route


sudo route del -net 192.168.3.0 gw 192.168.1.1 netmask 255.255.255.0 dev eth0

sudo route del -net 192.168.3.0 gw 192.168.1.1 netmask 255.255.255.0 dev eth0

A quick way to add default route


route add default gw 192.168.1.1

A  quick way to delete default route


route del default gw 192.168.1.1